React周りの必要なモジュール
React
- react-dom
Redux
- react-redux
- redux-thunk
React-router
- react-router-dom
- react-router-redux
- history
このあたりの使い方はちゃんと押さえておく。
あとはreduxのreducerでどこまでの処理を書くかってところが知りたい。
これほんとわかりやすかった。

React入門 React・Reduxの導入からサーバサイドレンダリングによるUXの向上まで (NEXT ONE)
- 作者: 穴井宏幸,石井直矢,柴田和祈,三宮肇
- 出版社/メーカー: 翔泳社
- 発売日: 2018/02/19
- メディア: 単行本(ソフトカバー)
- この商品を含むブログを見る
web extensions書き直した。
どうにも昨日作ったweb extensionがきもちわるいかったので書き直した。
popup.jsでどうこうするやつはスコープの生き死にがわかりづらかった。
てことで現在はpopup.jsではなくbackground scriptsで管理するようにした。

async/awaitとfetchAPIを使って書き直した。
非同期はわかりづらいけど最終的には各スクリプトにイベントリスナを追加する形で受ければ上手くいった。
イベントリスナで受けるのは思い付きだったけどうまくいった。よかった。
popup.js
//background scriptにリクエストを送る。
browser.runtime.sendMessage({text:''},function(response){
  document.getElementById('title').innerText = `you have selected ${response.artist}`
})

//background script からリクエストが来たらその通りにレンダリングする。
browser.runtime.onMessage.addListener(function(request,sender,sendResponse){
  console.log(request)
  render(request)
  sendResponse({text:'message received'})
})

function render(request){
  const similar_artist = request.state.similar_artist
  console.log(similar_artist)
  document.getElementById('title').innerText = `you have selected ${request.artist}`
  let html = ''
  for (key in similar_artist){
    html += `<br /><div><img src = ${similar_artist[key].image[1]['#text']}>${similar_artist[key].name}</div>`
  }
  document.getElementById('artist').innerHTML=html
}
background.js
//初期値の設定、選んだアーティストと似ているアーティスト

console.log('background start!')

//まずはAPIを叩くFunctionを作る。asyncなやつ
async function getSimilarArtist(artist) {
  var state = {
    artist_name: artist,
    status: "none",
    similar_artist: "",
  }
  const api_key = '6365215872671c325787a220ef38ae1c'
  var url = `http://ws.audioscrobbler.com/2.0/?method=artist.getsimilar&artist=${artist}&api_key=${api_key}&limit=10&format=json`
  fetch(url).then(async(response) =>  {
    var results = await response.json()
    state.status = "fetched"
    state.similar_artist = results.similarartists.artist
    //console.log(state)
    //最後にmessageをpopupに送る
    browser.runtime.sendMessage({
      artist: artist,
      state: state
    })
  })
}

browser.runtime.onMessage.addListener(function(request, sender, sendResponse) {
  //現在のタブを取得する
  browser.tabs.query({
    currentWindow: true,
    active: true
  }, function(tab) {
    browser.tabs.sendMessage(tab[0].id, {
      text: ''
    }).then(function(response) {
      getSimilarArtist(response.str)
    })

  })
})
content-script.js
//単純にメッセージが来たらそこにレスポンスを返すだけ
browser.runtime.onMessage.addListener(function(msg,sender,sendResponse){
    title = document.title
    str = document.getSelection().toString()
    console.log(str)
    sendResponse({title:title,str:str})
})
web extensions 作ってみた。
これ以上web extensions勉強しても知見が得られそうにないので実際に作ってみた。
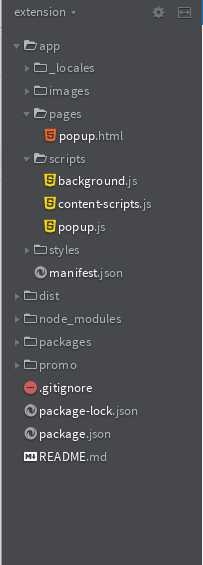
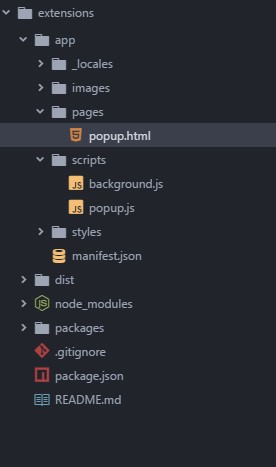
generator-web-extension使用。
インストール方法はコチラ
やりたいことはボタン押したら選択範囲を検知してその選択範囲がアーティストならlast.fmAPIを利用して
似たアーティストを返すというもの。
ソースはこっち
やっぱ実際に書いてみるのが非常にわかりやすくてよかった。
つまづいたところ、というかなおしたいところ
popup.js
import LastFM from 'last-fm'

browser.tabs.query({
    currentWindow: true,
    active: true
}, function (tab) {
    browser.tabs.sendMessage(tab[0].id, {
        text: ''
    }).then(function (response) {
            const title = response.title
            const str = response.str
            document.getElementById('title').innerText = `you have selected ${str}`
            searchSimilarArtist(str)

        }

    )
})

function searchSimilarArtist(artist) {
    //authentificate
    const auth = new LastFM('6365215872671c325787a220ef38ae1c')
    // for debug:console.log(artist)
    //return artist similar to given name
    const data = {
        isFound: false,
        result: "ea"
    }
    auth.artistSimilar({
        name: artist
    }, (err, data) => {
        if (err) {
            data.isFound = false
            data.result = err
            console.log(data)
        } else {
            data.isFound = true
            data.result = data
            //for debug:console.log(data)
            let html = ""
            for (var i = 0; i < 10; i++) {
                html += `<br /><div>${data.artist[i].name}</div>`
            }
            console.log(html)
            document.getElementById('artist').innerHTML = html
        }
    })
}
この中のfunction searchSimilarArtistのauth.artistSimilar関数のコールバック処理
ここで全部分けてるからそれを別の処理に移したいのだけどlet html ~の部分をdataをreturn するまでのfunction にして以降にdataをレンダリングfunctionに切り分けたいのだがうまくいかない。
dead objectがどうのって怒られた。
多分非同期的にプログラムが進んでてdataが返ってくる前に次に進んじゃっているのが原因のはず。
うまくレンダリングできるようにならないかな。
これからやりたいこと:
- これをreduxのフローに沿って書き直してみたい。
- うまくフローに乗せれたら次は色々(アーティストの画像とか)も表示できるようにしたい。
さてうまくいくかな
generator-web-extension使ってみよう。
なぜ?
いきなりQiita
とあったのでgithubページ見に行くとなんかdeprecatedなページを見た気がしたので。(気のせいでした)
どうやらgenerator-chrome-extension-kickstartと勘違いしたらしい。
でもchromeではなくFirefox派なのでgenerator-web-extensionを使ってみようと思う。
インストール
npm install -g yo generator-web-extension
使い方
最初に
ディレクトリを作り、そこでターミナルを開いてコマンドを打つ
mkdir myfirstextension

cd myfirstextension

yo generator-web-extension
すると会話形式でScafoldingが始まった。適当にポチポチしていくとひな形が作成される

どうやらこれで開発するとnodeのモジュールなどが使えるようだ。
ホットリロード
コマンドはnpm run dev firefox
これで./dist/firefox/フォルダが出現する。
これをabout:debugging内の

一時的なアドオンを読み込めば

あとは勝手にホットリロードされる。
Cannot find module '/home/yohei/.nvm/versions/node/v9.10.1/lib/node_modules/yo/node_modules/spawn-sync/postinstall てでたとき
npm install --global yo できなかった。
ログはこんな感じ
module.js:478
    throw err;
    ^

Error: Cannot find module '〜/.nvm/versions/node/v9.10.1/lib/node_modules/yo/node_modules/spawn-sync/postinstall'
    at Function.Module._resolveFilename (module.js:476:15)
    at Function.Module._load (module.js:424:25)
    at Module.runMain (module.js:611:10)
    at run (bootstrap_node.js:387:7)
    at startup (bootstrap_node.js:153:9)
    at bootstrap_node.js:500:3
npm ERR! code ELIFECYCLE
npm ERR! errno 1
npm ERR! spawn-sync@1.0.15 postinstall: `node postinstall`
npm ERR! Exit status 1
npm ERR!
npm ERR! Failed at the spawn-sync@1.0.15 postinstall script.
npm ERR! This is probably not a problem with npm. There is likely additional logging output above.

npm ERR! A complete log of this run can be found in:
npm ERR!     /root/.npm/_logs/2018-04-25T14_16_41_992Z-debug.log
なんやておもってググった。
どうやら
てことでserverlessというモジュールだったのでYOに変えた。
npm install -g try-thread-sleep

npm install -g yo --ignore-scripts spawn-sync
これでなんかしらんがインストールできた。
調べてみるとspawn-syncのエラーらしい。その内なおることを期待しとこう。
PythonでおんどとりWebStrageAPIを利用する。
おんどとりWebStrageがいつの間にかAPIに対応していた。知らなかったw
はじめにお読みください | おんどとり WebStorage API
ていうことでサクッとPython3でAPIを取得してみた。
【API_KEY】【ID】【PASS】は各自の環境に応じて書き換えて下さい。
import requests

import json

url = "https://api.webstorage.jp/v1/devices/current"

api_key = "【API_KEY】"
login_id ="【ID】"
password = "【PASS】"

paylord = {'api-key':api_key,"login-id":login_id,'login-pass':password}

header = {'Host':'api.webstrage.js:443','Content-Type': 'application/json','X-HTTP-Method-Override':'GET'}

def main():
    response = requests.post(url,json.dumps(paylord).encode('utf-8'),headers=header).json()

    print(response['devices'][0]['channel'][0]['value'])
    print(response['devices'][1]['channel'][0]['value'])
    print(response['devices'][2]['channel'][0]['value'])

if __name__ =="__main__":
    main()
これで取得できるはず。seleniumとかいらんくなったね
sip.jsで通信する。1.demo phoneで通話するまで
sip.jsのgetting startedを簡単に解説。
【環境】 centOS:7.4 Asterisk:13.20
まずはAsteriskのインストール
必要なパッケージのインストール
yum install wget gcc gcc-c++ ncurses-devel libuuid-devel jansson-devel libxml2-devel sqlite-devel libsrtp-devel openssl-devel
Asteriskのダウンロードとインストール
cd /usr/local/src/
wget http://downloads.asterisk.org/pub/telephony/asterisk/asterisk-13.20.0.tar.gz
tar zxvf asterisk*
cd /usr/local/src/asterisk*
./configure --with-pjproject-bundled
make menuselect
メニューセレクト画面でres_srtpとpjprojectにチェックが入っているか確認する。
入っていなければsrtp libraryをインストールする インストール方法は→コチラ
make && make install
make samples
make config
インストールした後でポートを開放する。 開放するポートは 5060 8089/udp 10000-20000/udp
意外と忘れがち
DTLSのインストール
mkdir /etc/asterisk/keys
cd /usr/src/asterisk*/contrib/scripts
./ast_tls_cert -C -O 【クライアントのIPアドレス】"My Super Company" -d /etc/asterisk/keys
ここでハマった。IPアドレスはホスト側(Asterisk)ではなくてHP側(タブレット側)のIPアドレスを書いておく。
http.conf,sip.conf,extensions.confの編集。
http.conf
;http.conf
[general]
enabled=yes
bindaddr=【ホスト側のIPアドレス】 ; Replace this with your IP address
bindport=8088 ; Replace this with the port you want to listen on
tlsendable=yes
tlsbindaddr=【ホスト側のIPアドレス】:8089 ; Replace this with your IP address
tlscertfile=/etc/asterisk/keys/asterisk.pem
sip.conf
[general]
realm=192.168.10.14
udpbindaddr=192.168.10.14
transport=udp
maxexpirey=3600
defaultexpirey=3600
context=default
bindport=5060
bindaddr=192.168.10.14
srvlookup=yes
allowguest=no
disallow=all
allow=ulaw
allow=alaw
allow=gsm
allow=vp8
allow=h264
language=ja
udpenable=yes
tcpenable=yes
icesupport=yes

[1060];webRTC client
type=friend
username=1060
host=dynamic
secret=pass
encryption=yes
avpf=yes
context=default
directmedia=no
transport=udp,ws,wss
force_avp=yes
dtlsenable=yes
dtlsverify=fingerprint
dtlscertfile=/etc/asterisk/keys/asterisk.pem
dtlsprivatekey=/etc/asterisk/keys/asterisk.pem
dtlssetup=actpass
nat=force_rport
rtcp_mux=yes
allow=vp8,h264,ulaw
dtmfmode=rfc2833
extensions.conf
exten => 1060,1,Dial(SIP/1060)
でOK
あとはdemo phoneに各種パラメータを記入したらOK